
Date: 26 Oct 2021
Issue
Before starting to work on the brakes of any vehicle, decide whether you are competent and confident enough to complete the work.
Brakes are pretty important so you do not want to get this wrong.
The early Cortina’s pre-62 had drum brakes all round.
The later Cortina’s 63 onwards have discs on the front and drums on the rear.
Many early Cortina’s were converted to discs on the front as discs are far superior braking devices.
This article focusses on standard cars fitted with disc brakes.

1200cc Cortina’s have smaller brake callipers than 1500cc Cortina’s.
Often the smaller callipers fitted to the 1200cc cars are found on 1500cc cars, especially, if the engine was upgraded and some time in the cars life.
In my limited experience the 1200cc callipers cope well with an unmodified 1500cc engine in the car.
If the car has more power than and weight than originally built then braking system should have been upgraded and retested when the car was upgraded, if not now is a good time to look into this.
The article below shows 1200cc callipers, but I expect the 1500cc brake pad change is near identical with the pads and callipers being a little larger.
Diagnosis
Brake pads are a consumable part of a car i.e. they wear out.
The rate at which they wear out is relative to the amount of use the car gets and your style of driving e.g. a car doing long motorway journeys at a constant speed will have a brake pad life longer than that of a car aggressively driven around country lanes.
Check pads at least once a year. If pad depth is less than 2mm change the pads immediately as they are near end of life.
Always change both sides at the same time (or you will end up with off-balance brakes which is very dangerous).
If one pad is less worn than the other check the calliper piston is not rusted or stuck as this reduces brake performance significantly. If this problem is found refer to the later part of this post that covers the joys of calliper rebuilding.
Unlike modern cars it is unlikely that discs will unlikely be worn out, check for deep scoring or excessive thinness otherwise you can re-use discs.
Repair
Removing wheel

Remove the hub
Locate hub lever slot (if there is one)
Using a large flat blade screwdriver or similar tool carefully prise hub cap off (take care not to scratch the hub, trim or wheel)

Use wheel brace to loosen wheel nuts. Ok, let’s be realistic , the wheel nuts are probably really tight especially if put on with an air ratchet. You will need a 3/4 inch AF socket on a ratchet probably with a pipe extension (I have a torque ratchet that is super long that does the job nicely), other times a bit of old scaffold pole has been used to create leverage.
Only loosen the nuts at this time – DO NOT REMOVE THEM (of the car might fall on you)
Lift the car
Jack up the car to get front wheels off the ground
Always lower the car onto a fixed base axle stand once lifted off the ground
Never rely on a hydraulic trolley jack as the only support (especially a 30 year old one or one you borrowed with an unknown history). If you are using the jack that came with the car, definitely do not rely on it to support the vehicle during servicing – it was design for a quick wheel change and that is all.
Remember if a car falls on you it will ruin your afternoon.

Changing the pads
Turn the steering wheel to get easy access to brake pads.
Remove the pin retainer springs (some snub nose pliers might be needed)
Remove the pin retainer springs (some snub nose pliers might be needed)

Slide out the pad retainer pins

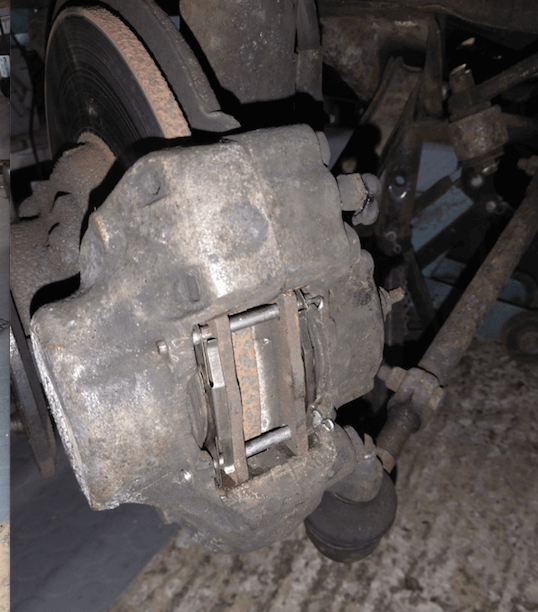
Now release the pads, for this a G-clamp is required
Using the G-clamp levering on the calliper itself ease each pad back until it and the anti-squeal shim are loose.
Once the pads are removed drive the calliper cylinders back into the calliper to ensure they move freely.
At this point it is a good idea to check the brake fluid reservoir does not overflow.
Easing the calliper cylinder back forces hydraulic fluid back up the system into the reservoir (there should be enough space in the reservoir to allow ease back on one calliper at a time, but if it is over full the fluid will overflow and take the paint off in your engine bay).

If you use a screwdriver as shown below (and as often seen in a garage) be prepared to replace a bent disc.

Assuming the callipers are moving freely, the pads can now be replaced.
Rebuilding a calliper
If the calliper cylinder is stuck then you are in for a long weekend of swearing as a calliper rebuild will be required. The rebuild involves:
- Removing the calliper
- Splitting the calliper
- Taking care NOT TO LOSE the little O-ring by the bleed nipple
- Extracting each cylinder
- De-rusting each cylinder
- Inserting each new seal
- Getting the cylinder back into the calliper (prepare to lose knuckle skin)
I did an overhaul once and it was horrible – since then I used a local mechanic.
How to do this is not written in detail in these notes but you basically clamp one cylinder, remove calliper from hub assembly, use brake pedal to drive a cylinder out, remove calliper from car fix the problem, put back on car and do the other cylinder – as said much swearing). If you chose to split the calliper to sort out the cylinders – DO NOT LOSE THE LITTLE O-ring that stops the fluid leaking – this is not provided in repair kits.
Replacing Pads
Back to the task, next take a key hole file and de rust the pad runners and pad edges (make sure there are no burrs).

Apply a smear of copper grease to the runner surfaces and pad edges and insert each pad. DO NOT GET GREASE ON BRAKE PAD SURFACE

Don’t forget to smear the internal faces (not seen in this photo)

Brake pads in

Anti-squeal shims in

Pins in

Pin retainer clips in

Set up the replaced pads
With pads back in, the brake pedal will not yet be ready.
Carefully depress the brake pedal in the car until a few times until the pedal is solid again.
Return to the calliper and check the disc can be turned – it will be stiff and appear to bind but it should turn with some levering. If it does not turn check calliper again as the pads may not be releasing properly when the pedal is no longer pressed.
Bleeding the system
It is easier to bleed the calliper whilst the wheel is off so I recommend you do this before replacing the wheel.
Bleeding is advised if it has not been done for a while as moisture might have contaminated the hydraulic fluid. Most cars use DOT4 compatible fluid. Refer separate post.
Refitting wheel, trim and hub cap
After bleeding refit the wheel hand-tightening each nut whilst the wheel is off the ground. Puts nuts onto wheel hub always working diagonally across the hub.
After lowering car to ground tighten the wheel nuts to 60 lb per square foot using a torque bar (I start at 50 lb/sq/ft and then increase the torque working across the wheel)
Refit the hub by placing carefully on the wheel and giving a sharp tap with the palm of your hand.
Parts
Approximate prices from: as of 2019
| Part | Description | Supplier | Cost |
|---|---|---|---|
| 516212 5005 Ford Cortina Mk1 | FRONT BRAKE CALIPER REPAIR SEALS KITS x2 (Ford Cortina Mk1 Parts) (Lotus & GT) (Sep 65- 66) Brake Braking repair kit kits (Other vendors also stock the kit) | MEV spares | £28.00 |
Note: Other vendors also stock the kit.
Leave a Reply