
Date: Jul 2019, May 2022
Issue
Fuel needle on dashboard not moving when ignition turned on – possible causes include sender unit failure
Fuel appears under car when filling or stopping – WARNING – fix this urgently
Engine misfires generally especially at high rev’s.
Diagnosis
Leaks
When filling the tank very full fuel appears under the car. Inspect filler tube from under rear of car. As soon as possible, remove the tank to investigate and repair.
Leaks of fuel at rear of car that occur all the time might indicate a rotten tank. Remove tank, investigate and repair.
WARNING – DO NOT LEAVE LEAKS UNRESOLVED THEY ARE DANGEROUS
Tank Sender Unit
When the fuel gauge not moving it is possible there is a disconnection somewhere in the wiring or that the voltage stabiliser (mounted on the back of the dial) has failed.
When the fuel gauge moves to empty or low and won’t go much higher when the tank is filled, this indicates a punctured float. Remove tank and investigate.
Mis-fire
Mis-fires can have multiple causes including: dirty fuel in tank being picked up and sent to carburettor. Disconnect fuel line and use a temporary feed from a clean fuel tank to prove the issue.
Repair
Getting ready
It is recommended to use as much fuel from the tank first (by running the car as normal – don’t run out though!!). Less fuel is less weight in the tank and less chance of spillage when the tank comes down.
- Disconnect battery earth (or positive if positive earth) – to avoid any sparks
- Remove spare wheel
- Apply penetrating oil to the 8 x tank mounting bolts

Apply penetrating oil to filler clips (the one nearer the filler itself will probably easiest to remove.
Apply penetrating oil to breather tube.
Jack car up and put on axle stands.
Go for coffee and let the penetrating oil do its work
Dropping the tank
Release the 8 retainer bolts quarter of a turn to ensure you can remove them without creating any sparks once the filler neck is removed.
Remove the breather circlips x 2 (I guarantee one will be rusted solid so good luck – you might need to cut the clip with a saw)

As said, there is always one:

Slacken the main filler clip. Move the tank on the jack to expose this clip.

Remove filler cap and remove the four screws holding the filler neck to give some wiggle room
Now loosen the 2 bolts that secure the spare wheel brackets in the forward position so these brackets can swing out of the way.

Remove fuel line clamp near shock absorber
Disconnect fuel line to pump (should be connector above diff somewhere), unclamp and carefully slide flexi-line off the metal fuel line.
Remove the 4 bolts holding the tank on the rear lip.
Now, prop the tank and remove the 4 bolts securing the tank in place.
Remember you are making a petrol bomb so take great care.
You may need to move the tank about a bit to release the fuel filler hose.

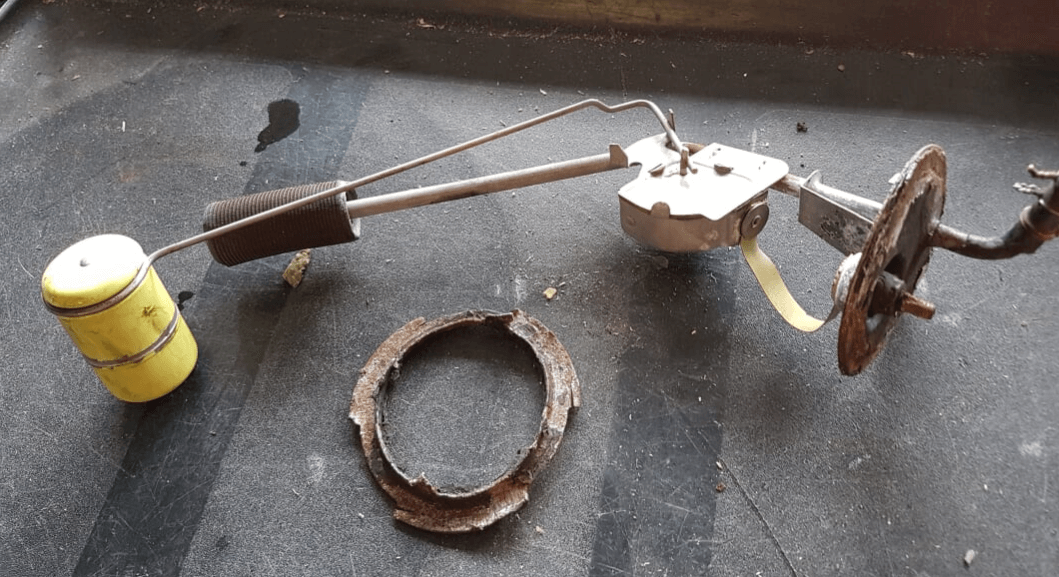
Removing the sender unit
Clean the top of the tank with an old tooth brush and some paraffin to prevent muck dropping into the tank.
The sender is held in with a lock ring that rotates in and out

My lock ring was in a terrible state so I levered it out in the end so as not to damage the tank or sender unit.
With the lock ring out the sender and fuel pick up assemble lifts out (do this gently).

The float can be unclipped from the sender.
Shake the float to see if is full of fuel. If there is any fuel inside then replace it.
Put a resistance meter across the unit and check the resistance changes as the float lever moves up and down.
Taking some measurements
Depth


Electrical resistance across the sender unit
Whilst I had the estate sender off I took some measurements:
| Float state | 2019 | 2022 |
| Full | 93 ohms | 95.8 ohms |
| Mid | ?? 21 ohms ?? | 83.3 ohms |
| Empty | 67 ohms | 73.1 oms |
I used different meters between 2019 and 2022, I suspect the 2022 figures are more accurate as I spent a little more time preparing to measure resistance i.e. used a Dremel to clean all contact points and used a higher quality meter.

Other notes on senders and gauges
It is important that your sender impedance and gauge deflection are matched. I did not experience this issue as my sender was working and failed, however, others restoring vehicles or buying an unknown vehicle may encounter issues with the gauge not accurately representing the fuel in the tank. Of course, a sender can get stuck too so you’ll need to investigate both ends.
2022 Another failure

To repair the above I soldered a wire strap between the two ends.
Reassembly is basically a reverse of the removal procedure
A couple of recommendations:
- Paint top of the tank (as it cannot be reached when in place)
- Check resistance across sender before re-using, refer to measurements above.
- Check connection of power wire to the sender is good (tank has to come down to fix any problems)
- Check sender is earthing through tank before inserting back under the car (continuity check sender plate to tank, it connects through lock ring (which you might have pre-painted)
- Be very careful when lifting the tank not to create any sparks.
- Don’t forget to tilt the tank in
Checking the tank earth and resistance across sender (tank is approximately half full so 24 ohms is good)

Replacing missing lock washers, using some spares that just happened to be in the garage.

Below, a lot of blocks in place the tank is presented back to the car. In this case the reassembly is without anyone else to help. Note the slop cloth, this will come out as the filler approaches the chassis rail.

Troubleshooting a known good sender
- Check you have voltage on the green-white wire coming to the tank. Will be 12v (through stabilizer) – need to double-check this
- Check tank is earthed well, and re-measure your resistance (it will be at whatever level the fuel is in the tank!!)
- Check the connection between green/white and green black/wire.
- The worst case is to take tank down and recheck everything off the car.
The finished product
The meter is exactly where it should be.

Parts
Approximate prices from: 2019
This is where things get fun, the estate sender locking ring differs from the saloon (oh joy of joy).
I had to contact a classic Mustang supplier as the parts are common.
Mustang ’66 Lock ring, seal and float
| Part | Description | Supplier | Cost |
|---|---|---|---|
| C0AZ-9A307-B | Locking Ring Mustang Spare Parts: 64-73 Sending Unit Retaining Ring | Mustang Maniac | £8.40 |
| C0AF-9276-A | Locking Ring Seal Mustang Spare Parts: 64-73 Fuel Sending Unit Gasket | Mustang Maniac | £4.80 |
| C0AZ-9202-B | Brass Float* Mustang Spare Parts: 64-73 Brass fuel sender float | Mustang Maniac | £24.00 |
| Fuel line Jubilee clips x 2 6-11mm | Halfords / eBay | £3.80 | |
| Breather tube Jubilee clips x 2 16-22mm | Halfords / eBay | £4.83 | |
| Fuel filler Jubilee clips x 2 55-70mm | Halfords / eBay | £4.90 | |
| F17 | Fuel System: F17 – Fuel filler neck hose estate | Club Spares | £8.00 |
| Green/black classic car wire 1mm (16.5A) x 5m 3m lengths of 1mm² 16.5A cable – 85 COLOURS TO CHOOSE FROM – 12v car wire loom | eBay | £3.75 | |
| Electrical bullets and connectors 24 bullets, 4 singles and 4 doubles (you need the 2 singles and 2 bullets) classic car wiring bullets for sale | eBay | £7.99 | |
| Heat Shrink 4.8m x 1m Heat Shrink Tube 2:1 Electrical Tubing Sleeve Cable Wire Heat Shrink All Colours | eBay | £1.30’ish |
Remember to add delivery costs to prices.
Mustang Maniac postage £10 (killer price)
*Note: I suspect the new lead-free fuel might dissolve the solder used in the float, the new one lasted 2 years. I have replaced it with a plastic alternative.

Note: The above unit I spotted on eBay Ford Cortina Mk3/4/5 Fuel tank sender unit,single pipe,new | eBay It might be worth investigating at a later date to understand dimensions, resistance across and potential to modify to fit.
Leave a Reply