
Article first created: 5 Mar 2016
Issue
This article focusses on cars with standard 1200cc or 1500cc pre-crossflow engines. The principles are similar for modified cars but further consideration will be needed for engine bracketry for the alternator and to align pulleys and ensure fan belt runs correctly. For ease of conversion I purchased a C40 style alternator replacement (it was not much more than ‘any old alternator’ and made the conversion easier).
Dynamo charging is designed for cars that are on the move creating sufficient charge for the car and battery. In today’s traffic a lot of time is spent idling, this can lead to discharge of battery and ultimately a breakdown.
Simply put, dynamos are old technology, and an alternator is a superior solution.
Diagnosis
Battery discharges whilst car in use, car fails to start reliably as battery not at full capacity.
Repair
I looked at 2 units that look like C40’s but are in fact alternators:
- Dynalite – approx. £315
- Accuspark – approx. £150
Each replacement outputs 40A rather than the 20A of the original dynamo.
I chose the Accuspark unit (mostly for cost reasons).

Mechanical Part
Fitting a C40 dynamo replacement alternator is exactly the same as changing the dynamo.
- Remove the old unit from the car
- 1/2-inch ring and 1/2-inch open spanners to undo bracketry
- 1/2-inch socket to release fan belt tension
- Transfer the pulley drive to the new unit
- 9/16 spanner and a bar to jam the fin blades
- Loosen, and remove pulley and fins + woodruff key insert (as needed)
- Set up new alternator with woodruff key, fan and pulley
- Fit to car
Note: a new part may show up faults in other older components. In my case the new alternator revealed a very worn water pump (see replacing water pump). Diagnosis: the fan was clipping the water inlet pipe clip after re-fit. Investigation revealed a worn water pump bearing (and consequent seeping leak under the pulley.
Electrical Part
This is where things get more interesting.
First things first, the potential current output from the replacement unit is higher than that of the dynamo.
A standard C40 dynamo peak current output is 22A.
A standard dynamo replacement peak output is 42A.
This is very important as the existing car wiring is unlikely to be suitable.
A new cable will be required.
When installing cables ensure that the cable has sufficient lopping to enable some movement, but is secured so that it does not chafe or get tangled with other moving parts e.g. fan blade.
The circuitry is simplified when using an alternator. The regulator box is no longer required. The regulator can be removed and discarded or re-purposed as a connection manager for the new alternator (read below)

Purchase a 5m of brown, thin wall, 42A rated cable is available on eBay for at £2 a metre.
Also purchase an M8 ring crimp (£2 for 10 on eBay) and a 9.6mm female spade connector (£2 for 10 in eBay).
- Route the cable around the front of the radiator from alternator to battery
- Crimp and solder a large female spade connector to the alternator end.
- For a nice clean result also apply some red 6mm heat shrink over the new joint
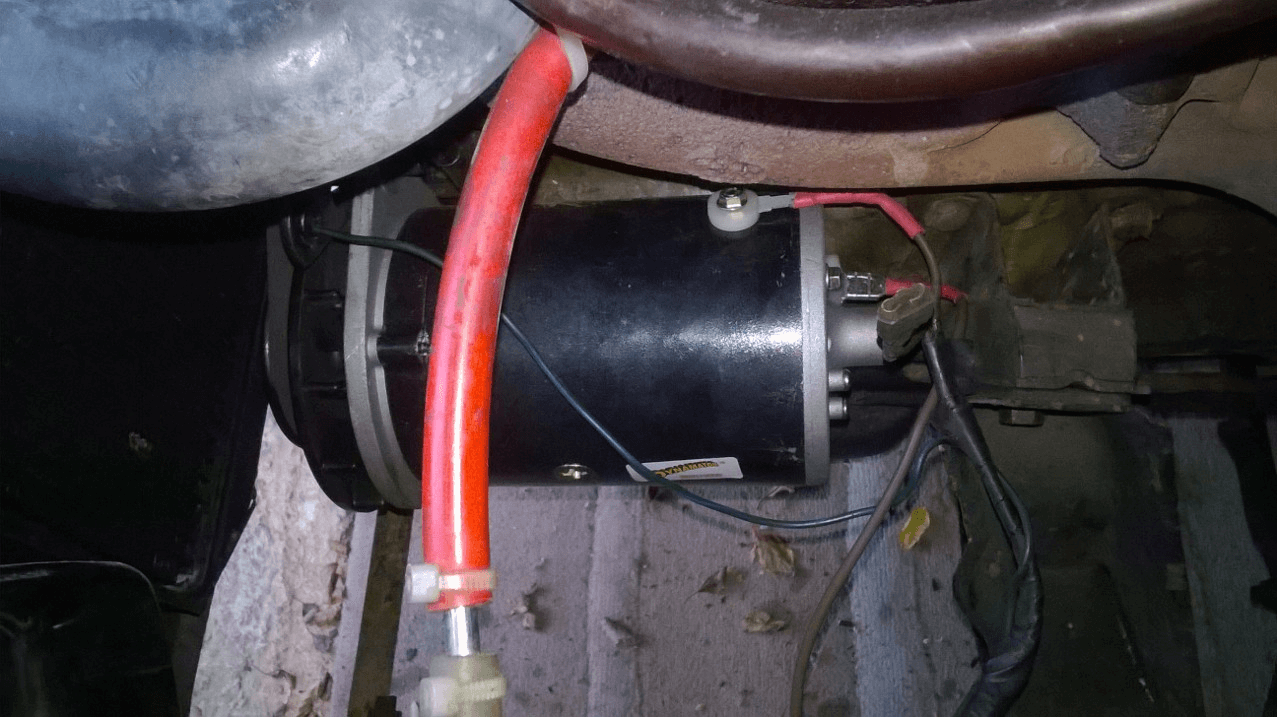
- In the picture below the new cable is connected the newly installed alternator, just visible on the right side of the picture.
- In this picture the new cable can be seen going direct from alternator to battery
- This protects the ancient vehicle wiring and any switches and joints therein from carrying additional current and thus reducing chances of failure (dashboard fire) later on

- Crimp and solder a ring to the battery end
- Again, use some heat shrink to ensure the joint is protected
- Add the new cable ring to the battery terminal
In this picture the new cable arriving at the battery. It has not been tied to the inner wing in yet.
Note: using this approach the the charge vs discharge ammeter on your dashboard is no longer working correctly, it will not report discharge. To resolve this requires a lot more wiring to separate the original wiring from the charge/discharge circuit and route the heavier gauge cable through the ammeter (if I ever fix this I will write a separate post).

- Next the field connection needs to be reinstated so the red light on the dashboard works
- i.e. Indicates that the alternator is working. It took me a while to work out how to do this elegantly and preserve the under-bonnet look. The regulator is no longer needed, but it can be kept after modification as useful base for cable connections (also the car still looks authentic).
Regulator modification
The regulator installed in the car (in this picture the modification is already done the only reason I know is the smaller terminal connectors have been swapped over).

- First, carefully note the cable connections to the regulator – they will need to be re-engineered but it us useful to know what goes where before starting modification of the regulator
- Remove the regulator from the car.

- Remove the plastic cover and put carefully to one side
- Carefully cut and isolate the spade connections from the relays
- I used a mini disk cutter (a rat tail file would also suffice)
Note there are 3 cuts to make to isolate the spade connections from the relays.

- Test each cut is complete using a continuity tester (or buzzer)
- If the cuts are not complete the car battery will continuously drain through the old relays
Note the left most cut will result in a contact point dropping out, this can be discarded
- Polish up the spade connectors whilst the regulator is on the bench
- Dirty contacts reduce alternator efficiency and potentially will generate heat

- Flip the regulator over and carefully remove the plastic ‘d-shape’ that prevented incorrect cable connection when using a dynamo). Refer picture below.

- Clean the black plastic cover whilst you have the regulator out, so it is nice and shiny again
- Refit cover to the modified regulator
- Re install the modified regulator into the car, however, connect the alternator field connection to the ignition switched power cable (refer picture below).
- The other retired connectors can be refitted to the now isolated spade terminals and the regulator re-attached to the inner wing.

- The unit will look like this when refitted.

- With the new alternator installed and wiring updated, test the system
- The red ignition light should be on before the engine is started when the key is turned and should immediately go out once the engine starts
- Check no cables are overheating, no connections sparking, and that the engine runs quietly and smoothly as it should. Any clanking, squealing or ringing noises indicate adjustment or investigation is required somewhere
Note: After fitting the new alternator there was a ringing sound when the engine was idling, this turned out to be a worn pulley bearing on the water pump so that needed to be changed too (probably showed up when I tensioned the fan belt correctly)
Parts
Approximate prices from: 5 Mar 2016 (ebay prices and links updated 2 Jan 2023)
| Part | Description | Supplier | Cost |
| C40 replacement | Accuspark | £150 | |
| or C40 replacement | Dynalite | £315 | |
| M8 ring crimp (sold in packs x 10) 100-20PCS NON INSULATED BRASS RING EARTH CRIMP TERMINALS M3 M4 M5 M6 M8 M10 | eBay | £10 | |
| 9.6mm female spade connector (sold in packs x 10) 2.8mm 4.8mm 6.3mm 8mm 9.5mm NON INSULATED SPADE CRIMP CONNECTOR TERMINAL (LUCAR) | eBay | £4.10 | |
| 5m x 5mm, 42A brown thin wall cable (£4 meter) Single Core Stranded 12v Cable Thin Wall Wire 24v All AMP Rating All Colours | eBay | £20 | |
| 1m x 6mm red heat shrink Heat Shrink Tube 2:1 Electrical Tubing Sleeve Cable Wire HeatShrink All Colours | eBay | £ 2.55 |
Total cost: Accuspark + parts ~£170
The old C40 dynamo can now be scrapped or sold on.
Leave a Reply